Embed the Pixel
Learn how to embed our conversion pixel for auto optimization.
A conversion pixel is a way to generate better and more accurate statistics for your campaigns.
Once the pixel is implemented on your website, you can start to understand if your ads are effectively generating conversions, and make data-driven decisions.
The process of installing conversion pixels involves copying 2 short HTML codes from your campaign page (located in Tracking pixel in the options menu), to your website on the designated pages you would like to track conversions for.
How this pixel works?
When web visitors are redirected to your campaign URL, our system adds a unique identifier to your website URL. This way, the Landing page pixel can securely save a cookie in your visitors' browser, only to be fetched later on if the visitor gets to your "Thank you" page. At this point, the cookie is deleted from the browser, and your conversions meter increments for relevant campaigns and ads that brought the visitor to your website in the first place.
How to implement the pixel?
There are 2 steps to properly implement the conversion pixel on your website.
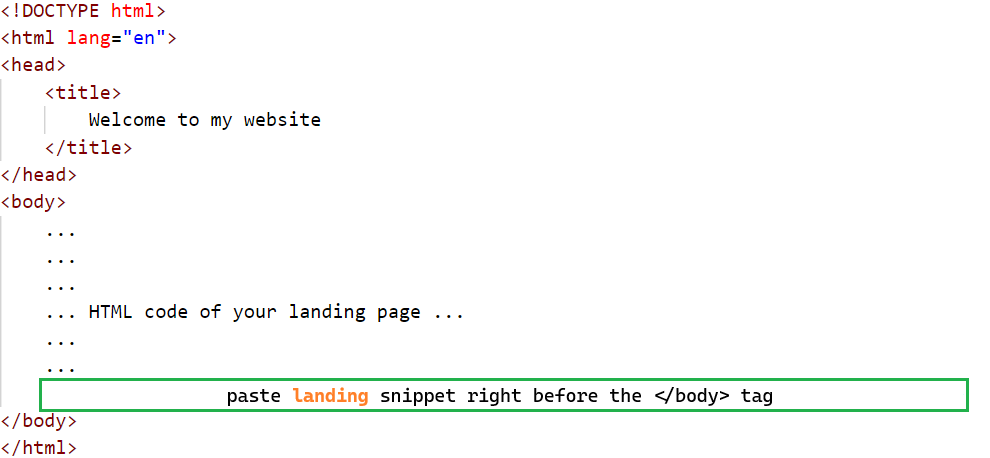
- Implement the Landing page code right before the closing of the HTML Body tag in your landing page.
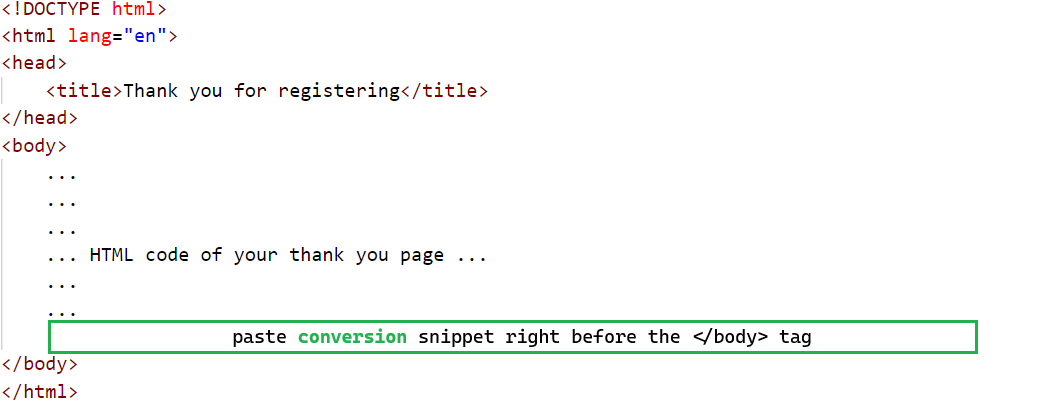
- Implement the Thank you page code right before the closing of the HTML Body tag in your thank you page.
Both of the steps above are required for the system to report conversions correctly to your campaigns.
Important points
- The Landing page and the Thank you page should not share the same web address.
- Both pages should be on the same domain (and sub-domain).
- Lifespan of the tracking cookie is 30 days. If a visitor converts after more than 30 days of being redirected to your website, the conversion will not be counted.
- Use of URL shorteners can break the pixel, and conversions may not be reported correctly.
What is a Landing page?
It is the first page visitors see after clicking on your ad on another website. In 99% of cases, it is the target URL of your campaign.
What is a Thank you page?
A page on your website that users can see only if they had engaged and fulfilled your marketing objective.
Common examples for what type of pages qualify as a Thank you page:
- Post registration page (Thank you for signing up to our service)
- Purchase confirmation page (Thank you for purchasing our product)
It purely depends on your marketing objective, whether it's to make sales, generate leads or something else.
Implementation example
When implementing the HTML codes, make sure to copy them from your campaign page, in order to make sure you are using the latest and most updated version of the pixel.
Make sure the code is placed before the HTML tag in your source code, as shown in the example below.
Landing page implementation:

Thank you page implementation:

We hope this guide helps to better understand the role of the pixel and the implementation process.
If you feel this is too complicated, or prefer not to access your website code on your own, it is recommended to get professional assistance.
Useful references
Adding a tracking pixel to Wordpress